1. Eagle:
Rope behind you, arms extended out, down and low. Thumbs follow the handle of the rope and point toward the rope. (check younger jumpers to assure proper grip)

3. Swing & Stop:
From ready position, swing your rope over your head, and stop it in front of you. No jumping. Swing it back over the other way and continue doing so until it feels easy and smooth. Next try “Swing, Wait, Jump”.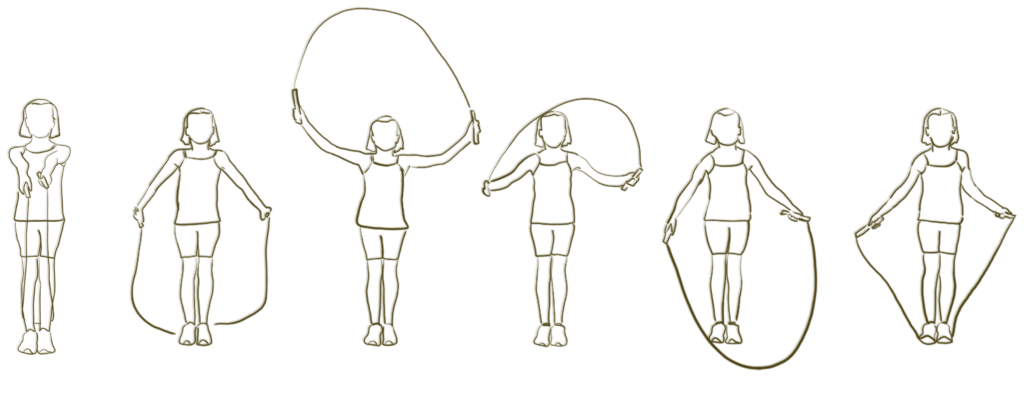
2. Ready Position:
Start here before doing anything.
From “Eagle Pose” reach arms straight out in front of you. Tug on the back of your legs with the rope. Always start in ready position.

4. Swing, Wait, Jump
One swing, wait for the rope to hit the ground. Then jump over it while keeping arms relaxed (no whipping motion required)
The Set Up
Shoes
Wear athletic shoes such as cross training or running shoes that provide support.
Surface
Jump on an athletic surface such as a sport court or hard wood floor. Adults should avoid jumping on hard or concrete surfaces. At home piece of plywood sized 4×6 or so can turn any spot into a jump rope platform.
General Sizing & Buying Guide:
Ages 4-5 = 7′ Rope
Elementary = 8′ Rope
5’7-5’10 = 9′ Rope
5’11 and taller = 10′ Rope
Types of Ropes
Licorice speed ropes are the most common and affordable and most versatile rope. Perfect for elementary through high school P.E.
Long Handled Freestyle ropes provides an extra long handle for performing skills with more ease. These are more costly and better for individual use.
Wire Ropes are used for speed and double unders.
Beaded Ropes are used for anything really. I use them for Double Dutch and Partner Routines such as Wheel, Shared Rope and Buddy Jumping
Adjusting Your Rope – Tie Some Knots
Some ropes come with an adjustable function inside of the handle. These adjustments are really meant to be done one time. Adjusting over and over will compromise the component.
If you’d like your rope to be shorter temporarily, then simply tie a knot on the rope portion below the handle. This option may be preferred, for example, where budgets are tight and only one rope size is being purchased. In my program, I buy mostly 8′ ropes, and a few 9′ ropes. This will fit students aged 6-13. For younger or shorter students we will simply tie knots and then untie at the end of class.
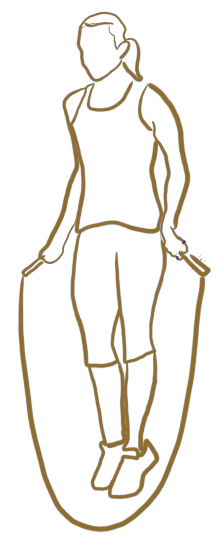 During the learning phase of rope jumping, focus primarily on learning the rhythm and timing of rope jumping. As your coordination improves, focusing on your posture, rope hold and rope spin will help you become more efficient and proficient.
Keep your hands in just below your hips. This will make your rope feel longer. Ever so slightly, shrug your shoulders.
If you rope feels too long or is hitting the ground too much, adjust the length. The rope should barely graze the ground, right in front of your toes.
Position your elbows back BEHIND your body and your wrists angled down toward the ground.
Spin the rope mostly with your wrists. Doing so will take practice.
Only bend legs slightly to absorb the shock of your landing. Avoid kicking your heels back, or picking forward.
Jump on your toes, only jumping high enough to clear the rope. Heels should not touch the ground when you land.
In order to jump low to the ground, you’ll need to spin your rope fast. Turn small quick circles with your wrists, just below your waist.
Try to jump at least 130 beats per minute (every time you jump counts as a beat)